Contribute
This is the contribution guide to the enough.community infrastructure which is based on Ansible and OpenStack. If you’re a seasoned Free Software contributor looking for a quick start, take a look at the list of bugs and features, otherwise keep reading.
Resources
- Repository and issue tracking: http://lab.enough.community/main/infrastructure
- Forum: https://forum.enough.community/
- Chat: https://chat.enough.community/enough/
- License: AGPLv3
- Who’s who
Bugs and features list
Each service under the enough.community domain can be worked on independently and have their own integration tests. There is no need to understand how Weblate is deployed if you’re improving Discourse, for instance.
Organization
All contributors are organized horizontally
- People with access to an exclusive resource must register themselves in the team directory
Getting started
git clone https://lab.enough.community/main/infrastructure
Running tests
- Install Docker.
The tests/run-tests.sh script builds a docker image suitable for
running the tests, with all the required dependencies, based on a
Debian GNU/Linux bullseye. The following volumes are bind-mounted:
- ~/.enough
- ~/.ansible
- the root of the infrastructure repository
The working directory, in the container, is the root of the infrastructure repository.
Installing libvirt
Manually run commands similar to playbooks/gitlab/roles/gitlab-ci/tasks/gitlab-ci.yml (it could be a playbook running on localhost with sudo sudo ?)
Running tests that do not require OpenStack
PYTEST_ADDOPTS='-m "not openstack_integration"' tests/run-tests.sh
Running tests that require OpenStack
Introduction
The tests running without OpenStack only cover a fraction of what Enough does. To verify that a playbook actually works, it needs to be run on a live host and tests must check that is working. For instance the tests for Weblate request that the Weblate server sends a mail and verify it reaches the postfix server.
When modifying a role or a playbook in the directory playbooks/ABC one is expected to add a test for the new behavior and verify it runs successfully:
tests/run-tests.sh tox -e ABC
When relevant, integration tests should be created as icinga monitoring checks so they can be run on a regular basis in the production environment to verify it keeps working.
SSH key
A SSH authentication key is generated by the tests which requires OpenStack. The private key is named infrastructure_key, the public key is named infrastructure_key.pub and both are located in .tox/ABC/.pytest_cache/d/dotenough/ABC.test/ directory.
Obtain an API token
Most integration tests need a publicly available DNS server. The https://api.enough.community provides a publicly available API to delegate a domain to the designated DNS server. Members of the group enough can sign-in, others can request access.
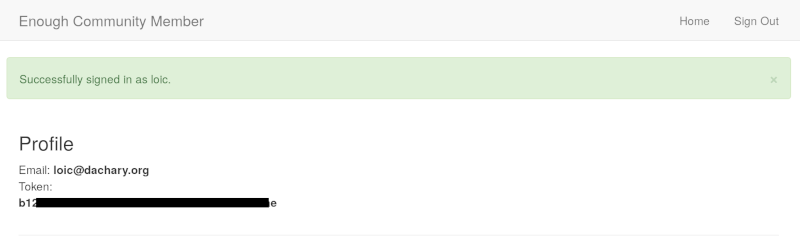
The Token: value displayed after signing in https://api.enough.community
must be set to the ENOUGH_API_TOKEN environment variable.
ENOUGH_API_TOKEN=XXXXXXX tests/run-tests.sh tox -e bind
Set the OpenStack credentials using clouds.yml
Assuming you have your own OpenStack tenant or one was provided to you, the clouds.yml file must be copied to tests/clouds.yml.
The openstack_provider variable must be added to the clouds.yml file:
---
openstack_provider: fuga
clouds:
...
or
---
openstack_provider: ovh
clouds:
...
It must define two cloud environment: production and clone (for backup restoration testing purposes). Here is a complete example:
---
openstack_provider: fuga
clouds:
  production:
    auth:
      auth_url: "https://core.fuga.cloud:5000/v3"
      user_id: "6a79dfb7410c4884fceb23031189b"
      password: "qecOSdBAH6ZjE4M2UnZbnnWdsZihe"
      user_domain_id: "99009ec244eebb85827488bb2aed4"
      project_domain_id: "9900e2c244eebb85827488bb2aed4"
      project_id: "203e72ec8a85b9dc808719e452902"
    region_name: "ams2"
    interface: "public"
    identity_api_version: 3
  clone:
    auth:
      auth_url: "https://core.fuga.cloud:5000/v3"
      user_id: "3b40cf2cb71b4bdc95c009347445f"
      password: "RBX0S2BdXWlBztUKkPWcAfnNFSNNj"
      user_domain_id: "de844dabe43948cb87ed24e2d5c438a9"
      project_domain_id: "de8abe43948cb87ed24e2d5c438a9"
      project_id: "82cb2f62a70f5928e3a4686622e39"
    region_name: "ams2"
    interface: "public"
    identity_api_version: 3
Running
tests/run-tests.sh tox -e <service name>
Note
If the command fails, because of a network failure or any other reason, it is safe to run it again. It is idempotent and will re-use the environment from the failed test.
The list of service names (i.e. tox test environments) is in the tox.ini file. It is possible to skip some steps to speed up test debugging:
$ tox -e bind -- --help playbooks
...
custom options:
  --enough-no-create    Do not run the create step
  --enough-no-tests     Do not run the tests step
  --enough-no-destroy   Do not run the destroy step
...
$ tests/run-tests.sh tox -e authorized_keys -- --enough-no-destroy playbooks/authorized_keys/tests
The domain name used for testing is in .pytest_cache/d/dotenough/bind.test/inventory/group_vars/all/domain.yml, where bind must be replaced by the name of the service. It is handy for debugging (i.e. browsing the web interface of a service, ssh to a machine that failed to run properly, etc.)
Upgrade testing
To verify that a service (icinga for instance) can be upgraded from a given Enough version (2.1.14 for instance), use:
$ tests/run-upgrade-tests.sh 2.1.14 icinga -- \
    --enough-no-destroy \
    --enough-driver=libvirt playbooks/icinga/tests
...
run-upgrade-tests.sh performs the following steps:
- checkout the
2.1.14tag into../infrastructure-versions/2.1.14/infrastructure - run
tox -e icingafrom the2.1.14directory and keep the hosts because of--enough-no-destroy - run
tox -e icingafrom the current version, re-using the hosts with the icinga version installed from2.1.14
ssh to a host under test
If tests/run-tests.sh tox -e chat was run and the hosts have not been destroyed because the –enough-no-destroy option was set, the following can be used to ssh on a host:
$ tests/run-tests.sh tests/ssh chat bind-host
debian@bind-host:~$
$ tests/run-tests.sh tests/ssh chat bind-host hostname
bind-host
Debugging tests
To run the tests manually within the test container:
$ tests/run-tests.sh bash
user@6642e3759c43:~/infrastructure$ tox -e flake8
Use the --log-cli-level switch in order to:
- enable log display during test run (live logging)
- control the test log level
For example:
$ tests/run-tests.sh tox -e py3 -- --log-cli-level=INFO -s -x tests/enough/common/test_openstack.py
–log-cli-level and following switches are from pytest.
To execute only one test:
tests/run-tests.sh tox -e py3 -- tests/enough/common/test_openstack.py::test_heat_definition
There should not be any leftover after a test involving OpenStack
fails, because the fixtures are supposed to thoroughly cleanup. But
bugs are to be expected in a test environment and it may be necessary
to manually remove leftovers, using the openstack command like so:
tests/run-tests.sh env OS_CLIENT_CONFIG_FILE=tests/clouds.yml openstack --os-cloud production stack listtests/run-tests.sh env OS_CLIENT_CONFIG_FILE=tests/clouds.yml openstack --os-cloud clone stack list
In case leftover are manually deleted using stack delete command, the
following directory must be manually removed: .tox/<test environment>/.pytest_cache/,
for example .tox/py3/.pytest_cache/.
In order to execute only one test related to a service, the related tox
environment must be used rather than the py3 environment. For example:
$ tests/run-tests.sh tox -e openvpn -- \
    -s --enough-no-create --enough-no-destroy \
    playbooks/openvpn/tests/test_icinga.py::TestChecks::test_service_openvpn
Execute Ansible on the test infrastructure
Display content of /path/to/a/file from bind-host when icinga
test environment is used:
$ tests/run-tests.sh .tox/icinga/bin/ansible bind-host \
   -i .tox/icinga/.pytest_cache/d/dotenough/icinga.test/inventory \
   -mraw cat /path/to/a/file
Check the value of an ansible variable:
$ tests/run-tests.sh .tox/icinga/bin/ansible bind-host \
   -i .tox/icinga/.pytest_cache/d/dotenough/icinga.test/inventory \
   -m debug -avar=ansible_host
Build and test the enough docker image
The enough Docker image can be built locally using:
tag=$(git branch –show-current) python -m enough.internal.cmd build image –tag $tag
Then define the enough alias using either:
eval “$(docker run –rm enough:$tag install –no-registry –tag=$tag)”
or
eval “$(python -m enough.internal.cmd install –no-registry –tag=$tag)”
Now the enough command uses the local Docker image.
Repository layout
The ansible part of the repository groups playbooks and roles in separate directories to reduce the number of files to consider when working on improving a playbook or a service.
playbooks/authorized_keys: distribute SSH public keysplaybooks/backup: daily VMs snapshotsplaybooks/bind: DNS server and clientplaybooks/icinga: resources monitoringplaybooks/infrastructure: VMs creation and firewallingplaybooks/postfix: outgoing mail relay for all VMs- etc.
The other scenarii found in the playbooks directory are services such as weblate or discourse.
The toplevel directory contains the playbook that applies to the enough.community production environment. It imports playbooks found in the playbooks directory.
Managing python dependencies
- adding a new dependency: pipenv install thepackage
- creating the requirements*.txt files needed to create a distribution: pipenv run pipenv_to_requirements -f